 Had enough of
fielding Facebook friend requests from total strangers? Don’t want the
world thumbing through your photo albums? Leery of oversharing Facebook
apps? Read on for 10 ways to put a lid on your Facebook account.
Had enough of
fielding Facebook friend requests from total strangers? Don’t want the
world thumbing through your photo albums? Leery of oversharing Facebook
apps? Read on for 10 ways to put a lid on your Facebook account.1. Shield your personal info
Facebook displays your name and profile photo to … well, pretty much everyone on Planet Earth, and there’s not much you can do about it.(Besides, if you want the fact that you’re on Facebook hidden from the world, you probably shouldn’t be on Facebook at all.)
But if you want to keep other personal details—such where you live, where you work, or your relationship status—under wraps, here’s how to do it.
- Visit your Facebook profile (a.k.a. your “timeline”) by clicking your name at the top of any Facebook page, then click the little “About” link just below your profile photo.
- Next, you’ll arrive at a two-column page with a series of different sections, from “Work and Education” to “Contact Info”—and next to each section heading, you’ll find an “Edit” button. Click the button to expand each section.
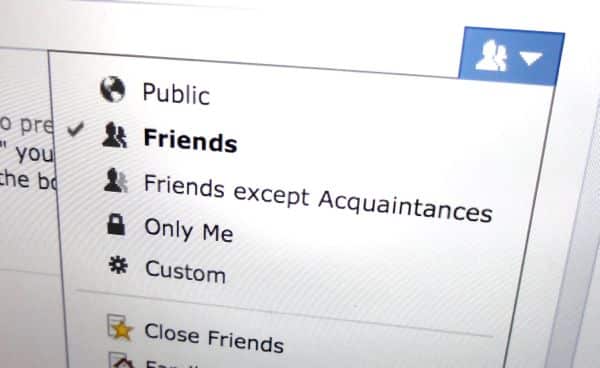
- Check out the little icons that show your the privacy settings for each nugget of information; for example, a globe next to your hometown means that everyone on Facebook can see where you were born, while a pair of small heads means that only your those on your Friend list can see where you grew up. Click the icon to see all your privacy options, from “Public” to “Only Me,” and select the setting to make a change. For example, don’t want anyone knowing where you live or work, or your home address? Click the appropriate icon and set it to “Only Me.”
2. Hide your photos
So, when was the last time you checked the privacy settings for all your Facebook photos? I’m constantly amazed by the number of fellow Facebookers I know who’ve belatedly discovered that their photo albums are wide open to the world. Here’s how to slam ‘em shut.- Click the Facebook logo in the top-left corner of any Facebook page, click the Photos link under the Apps heading in the left column, then click the “My Albums” button near the top of the page.
- You’ll arrive at a page with all your photo albums listed—and beneath each photo album, you’ll see more of those little privacy icons. Click an icon to change the privacy settings (again, from “Public” to “Only Me”) for a specific album.
3. Screen posts and photos tagged with your name
Don’t want everyone on Facebook—including, say, your boss, or your mom—seeing those photos of you at the office holiday party with a lampshade on your head? I know the feeling.Unfortunately, there’s not much you can do to keep people from uploading compromising pictures of you at the office holiday party on Facebook. That said, you can at least get the chance to review any post or photo that’s tagged with your name before it gets posted to your Facebook wall, for all to see.

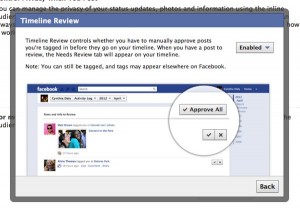
Facebook’s “Timeline Review” feature lets you
screen any tagged posts and photos before they appear on your timeline.
- On the main Privacy Settings page, skip down to the “Timeline and Tagging” section and click the “Edit Settings” link.
- In the pop-up window that appears, you’ll see an option labeled “Review posts friends tag you in before they appear on your timeline.” Click it, then make sure the pull-down menu on the following “Timeline Review” page is set to “Enabled.”
- From now on, you’ll get a notification whenever a Facebook friend tags you in a photo, and you’ll be able to review said snapshot before it goes live on your Facebook profile.
4. Stop Facebook from ID’ing your face in photos
Speaking of other Facebook users tagging your face in photos, Facebook has a (relatively) new feature that aims to make it easier for your friends to tag you in snapshots.Using “facial recognition” technology, Facebook scans newly uploaded photos and checks for familiar faces. If Facebook’s photo software thinks it’s spotted your face, it will suggest your name as a tag to the friend who uploaded the picture.
It’s a clever, handy, and (depending on how you look at it) potentially invasive tool—and yes, you can “opt out” of the feature, if you wish.
5. Block friends and/or frenemies from writing posts on your timeline
Like it or not, the world judges us based on our Facebook profiles, and that’s a good reason to think twice about which friends get to post messages and photos on your timeline—and which don’t.The good news is that you can control who can post on your profile in the “Timeline and Tagging” section of your Facebook privacy settings.
Note: Don’t forget that if you block everyone from posting on your timeline, you’ll miss out on getting birthday greetings posted to your profile.
6. Keep strangers from messaging or “friending” you
By default, anyone and everyone on Facebook can send you a message or a friend request.But if you’d rather not get notes or requests from strangers, old flames, or anyone else who isn’t already a friend (or a “friend of a friend”) on Facebook, here’s how you do it.
- Click the little down arrow near the top-right corner of any Facebook page, select Privacy Settings, find the “How You Connect” heading and click the “Edit Settings” link.
- On the pop-up window that appears, you’ll see a trio of settings. For the “Who can send you friend requests” and “Who can send you Facebook messages” options, click the nearly pull-down menus and select the setting you prefer: “Everyone,” “Friends of friends,” or “Friends” only. (For the “Who can friend you” setting, “Everyone” and “Friends of Friends” are your only two options.)
- There’s also a third setting in the “How You Connect” window that can allow—or block—others from finding your Facebook profile by searching on your email address or phone number. If you wish, go ahead and select a new setting for this option.
7. Shush your apps
Annoyed by all those alerts in your Facebook news feed about which songs your friends teed up in Spotify, what articles they’ve read on Yahoo, or what they’ve just pinned on Pinterest?Well, I have news for you: depending on the apps and websites you’ve connected to your Facebook account, your Facebook pals may well be seeing the same types of alerts about you.
That’s why it’s a good idea to take a gander at all the apps and sites that have access to your Facebook profile and review their privacy and permission settings.
You can also delete a specific app from your account, or even zap them all at once.
- Head back to your Privacy Settings (click the little arrow in the upper-right corner of the page, click the Privacy Settings link), then select the “Edit setting” link under the “Apps, Games and Websites” heading.
- Click the Edit Settings button next to the “Apps you use” heading to see a list of all the apps and sites that have access to your Facebook account, Click “Edit” to view or revoke specific access privileges (like whether an app can post to your wall, or access your data 24/7), or click the little “x” to remove an app entirely.
- Want to keep an app connected to your account, but don’t want it sharing all your activity with the world? Find the “Posts on your behalf” setting, then select the “Only Me” privacy option.
- Want to cut off access to any and all apps and websites in one fell swoop? Back under the “Apps you use” section, click the “Turn off” link, then click the blue “Turn off platform” button.
8. Hide your friends list
What’s the harm in letting the world see who’s on your Facebook Friends list? Well, maybe there isn’t any—or, on the other hand, perhaps you’ve got some friendship dynamics you’d rather not broadcast.In any case, it doesn’t take long to tweak the privacy settings for your Friends list. Here’s how.
- Visit your timeline, then click the Friends tile near your profile page.
- Click the Edit button near the top of the page, then select a new privacy setting from the pop-up that appears—anything from “Public” to “Only Me.”
9. Restrict access to all your old Facebook posts
How many updates have you posted to Facebook over the years—and what privacy settings did you use? Can’t remember? Join the club.Of course, you could always just start plowing through all your old posts using the Facebook “Activity Log.” Just go to your timeline, click the Activity Log button near the top of the page, then scan the privacy settings for all your posts, one at a time.
Want to speed up the process? If so, good news: you can change the privacy settings for any and all posts marked “Public” or “Friends of friends” to “Friends only” in just a few clicks.
10. Protect your account from hackers
Sure, it would be bad enough for your Facebook friends to glimpse photos of you behaving badly at the office holiday party.Consider this, though: what if a hacker managed to take control of your Facebook account?
Not only would they have total access all your data and photos, they could also post anything they wanted on Facebook, all while masquerading as you. Not good.
One great way to protect your account from hackers is to change your Facebook password as frequently as you can stand, ideally using “strong” passwords that don’t involve birthdays, the name of your family pet, or anything else that’s easy to guess.
An even better idea, though, is to secure your account with “login approvals”: secret, one-use-only codes sent via text to your cell phone whenever you (or anyone else) tries to log in to your Facebook account from a device that Facebook doesn’t recognize.
Using login approvals certainly adds another layer of hassle to logging in to your account, but trust me—it’s nothing compared to the hassle of dealing with a ne’er-do-well who’s wreaking havoc with your Facebook profile.


