Showing posts with label Mac Tips. Show all posts

5 ways to take a “Quick Look” at a file

5 ways to take a Quick Look at a file Mac tip: 5 ways to take a Quick Look at a fileWant to sneak a peek at a Word file, a folder full of photos, or a PDF without going to the trouble of launching a full-fledged application?
Meet “Quick Look,” a handy, built-in Mac tool that lets you take a quick glance at almost any file or folder without committing to firing up a program.

Now, there’s not a whole lot you can do while viewing a file with Quick Look besides, well … look at it. In other words, there’s no editing, composing, or tweaking allowed.
But Quick Look makes for an easy way to, say, peruse a contract that’s sitting on your desktop, or to arrange a big folder of photos into an easy-to-scan contact sheet.
Once activated, Quick Look will launch a preview window complete with a pair of arrow buttons for switching back and forth between the various files you selected.
You can also tap the thumbnail button in the top-left corner of the window for a bird’s-eye view of all your Quick Look documents, perfect for browsing a batch of photos.
Last but not least, click the little arrows in the top-right corner of the Quick View window to switch to full-screen view, then click the arrows in the floating control bar to return to normal view.
Quick Look floating control panel 300x206 Mac tip: 5 ways to take a Quick Look at a file
The full-screen Quick View mode features a floating panel of buttons that lets you cycle through a series of files, or see your documents from a bird’s-eye view.
So, that’s what Quick Look does. But how do you turn it on?
Well, there are actually five ways:

1. With a right-click

Right-click the file or folder (and yes, you can select multiple documents if you wish), then select “Quick Look” from the pop-up menu.

2. With the space bar

Select the files or folders you want to sneak a peek at, then press the space bar (or COMMAND + Y, if you wish).

3. With a three-finger tap

Select the files or folders, then tap (but don’t click) your trackpad with three fingertips.

4. Using the Quick Look button

Quick Look button in Finder folder 300x175 Mac tip: 5 ways to take a Quick Look at a file
You can click the Quick Look button to preview any selected item inside a folder.
To take a “quick look” at a file that’s in an open folder, just select it, then click the Quick Look button (the one marked with an eye) at the top of the folder.
Or, here’s another option: click the Action button (the button with the gear) and select “Quick Look.”

5. In the “Mail” program

In your Mac’s Mail application, you can take Quick Look an attachment by clicking the Quick Look button in the top-right corner of the message.

How to go back to the “classic” inbox look in Mac

How to go back to the classic Mac Mail look Mac Mail tip: How to go back to the classic inbox look
Starting last year with Apple’s “Lion” update for the Mac, the Apple Mail app got a whole new look—one that looks remarkably like the Mail app on the iPad, complete with a column of email messages on the left and a “preview pane” to the right.


Mac Mail classic layout setting Mac Mail tip: How to go back to the classic inbox look
Just check “Use classic layout” to move the preview pane from the right side of the Mail window to the bottom.

It’s a clean, modern look, and probably a welcome change for anyone who wishes their Mac worked more like an iPad or an iPhone.
But what if you were a fan of the old Mail inbox—you know, the one with the messages listed at top of the Mail window and the preview pane at the bottom?
Well, good news: you can go back to the “classic” Mail look in just a few clicks.
Here’s how…
  • Open the Mail app, click the Mail menu in the top-left corner of the screen, and select Preferences.
  • Click the “Viewing” tab at the top of the Preferences window.
  • Check the box labeled “Use classic layout.”

Bonus tips


Once you’ve switched the “classic” look back on, you can customize the columns of message details (including message size, the “To:” field, and whether a message has been “flagged”) in your list of email messages.
Just click the View menu at the top of the screen, hover your mouse over the Columns option, then check or uncheck the columns you’d like to show or hide.
Also: Want to get rid of the preview pane altogether? Click and drag it all the way down to the bottom of the window to make it disappear.

How to get your missing scroll bars back

Notice anything funny lately about scrolling on your Mac? (That is, besides the fact that scrolling on your mouse or keypad has been essentially reversed by default.)
Look carefully at the browser window on your desktop—and specifically, look at the right side of the window. Um, where are the scroll bars?
No, you’re not seeing things (or rather, you’re not not seeing things). Along with other changes borrowed from the iPhone and iPad, Mac OS X “Lion” (a major Mac system software update that was released in 2011) has adopted the barely-there scroll bars in Apple’s ubiquitous mobile devices.

In earlier versions of Mac OS X, prominent scroll bars were present at all times—handy for letting you know where you were in a lengthy web page, or for simply letting you know that there’s hidden content either above or below.
Mac OS X Lion scroll bars settings 300x126 Mac tip: How to get your missing scroll bars back
Just select "Always" in the General preferences pane to get your scroll bars back.

In Lion, however, the scroll bars are thinner and lighter than ever—and in some cases, they may completely disappear when you’re not actively scrolling.

While Lion’s no-scroll bar aesthetic might be daring from a design perspective, it’s a bit disorienting for the rest of us. Luckily, it’s easy to get those scroll bars back—not the old, larger versions, mind you, but at least you can keep Lion’s skinny-mini scroll bars visible at all times.
Here’s how:
  • Click the Apple menu at the top-left of the screen, then select System Preferences.
  • Next, select the General preferences pane; it’s the very first one, up at the top.
  • Under the “Show scroll bars” heading, you’ll find three options: “Automatically based on input device,” “When scrolling,” and “Always.”
  • Go ahead and select that last “Always” option. You’re done!

Handy trackpad gestures you need to try

Want to zoom in on a web page, twirl a snapshot in iPhoto, sneak a peek at the desktop, or look up the definition of a head-scratching word? You can do all that and more with a simple swipe, “pinch,” or tap on your Mac’s trackpad.
All 12 of these multi-finger gestures will work on newer-model MacBook trackpads, as well as on Apple’s $69 Magic Trackpad accessory for the iMac.
Ready to start pinching and swiping? Let’s start with…

1. Swipe up or down with two fingertips

Put two fingertips together, touch the trackpad, then swipe up or down to scroll on the selected page or window. (Does it feel like you’re scrolling backwards? If so, just turn off “Natural Scrolling” in your Mac’s system settings.)
Three finger swipe on the Mac trackpad 300x226 Mac tip: 12 handy trackpad gestures you need to try
Swipe up with three fingertips to launch the Mac’s “Mission Control” feature, or swipe down to see all the open windows of an active application.

2. Swipe up with three fingertips

Instead of swiping up with two fingertips, try it with three—and when you do, you’ll activate the Mac’s “Mission Control” mode, giving you a bird’s-eye view of all your open windows and desktop spaces.

3. Swipe down with three fingertips

Shows all the open windows for the active application. For example, if you’re using the Mac’s Safari web browser, swipe up with three fingertips to see all your open Safari windows—even those on other Mission Control desktops.

4. Swipe left or right with three fingertips

Switches you to the next Mission Control desktop; just keep swiping to cycle through all your desktops.

5. Swipe from right to left with two fingertips in Safari

Takes you back to the previous web page. Want to go forward again? Swipe once more with two fingertips—except this time, swipe from left to right.

6. Click the trackpad with two fingertips

Performs the equivalent of a “right-click” on your mouse. (You can also right-click by pressing and holding the CONTROL key as you click the trackpad.)

7. “Pinch” the trackpad

Zooms in on (or out of) the active window, depending on whether you’re pinching or spreading your fingertips. (“Pinching” on the Mac trackpad is the same as pinching on an iPhone, by the way; just put both your thumb and index finger on the trackpad, then slowly pinch them together or spread them apart.)
Three finger pinch on the Mac trackpad 300x227 Mac tip: 12 handy trackpad gestures you need to try
Pinch with four fingers to jump to the Mac’s Launchpad feature, or spread four fingers to reveal the desktop.

8. Pinch with your thumb and three fingertips

Activates the Mac’s “Launchpad” feature, which displays all your Mac applications in a handy grid.

9. Un-pinch (or “spread”) your thumb and three fingertips

Clears away the clutter of windows and reveals your bare desktop.

10. Pinch and twirl a photo

Want to twirl a snapshot around in iPhoto or the Mac OS X “Preview” application? Just select it, pinch the trackpad, and twist one way or the other.

11. Select a word, then double-tap with three fingers

Stumped by a word in an article you’re reading in Safari? Select the word, then double-tap the trackpad with three fingers; the definition will appear in a nearby pop-up window.

12. Double-tap with two fingers

Zooms in on a web page, focusing on the current position of the mouse. To zoom out again, just double-tap one more time.

Bonus tip


You can tweak or deactivate many of these trackpad gestures by tweaking your Mac’s settings. Just open the Apple menu in the top-left corner of the screen, select System Preferences, then click Trackpad.

How to sign a PDF without a printer or a scanner

Got a contract or some other document that you need to sign and return via email? Well, you could always print it out, sign on the dotted line, scan the newly-signed document, and then send the new version as an email attachment—an effective, if cumbersome process.
Another, better option: snap a photo of your John Hancock with your Mac’s iSight camera (just about any recent iMac or MacBook should have one), then paste it into the document you need to sign.

All you need is latest version of Preview, the Mac software that lets you open photos, PDFs, Word files, and other documents.
[Note: Your Mac needs to be running on "Lion," the new version of the Mac operating system, for this feature to work.]
Here’s how to get started.
  • First, open a PDF you want to sign using Preview. Just right-click on the document, hover your mouse over the “Open With” option, then select “Preview.”
  • Now that the document is open, click the View menu at the top of the screen and select “Show Annotations Toolbar.”
  • Right in the middle of the toolbar that appears, you’ll see a little, italicized “S” with a line through it, right next to a tiny downward arrow (as opposed to the “S” with the strikethrough line on the left). Click it, and select the “Create Signature from Built-in iSight” option.
  • A window titled “Signature Capture” should appear—and if your iSight camera is working properly, you should see yourself sitting there, staring at the screen.
  • Next, you’ll need a sheet of blank paper. Got one? Sign your name, and then hold it up in front of your Mac’s iSight camera lens. (Look for the little green indicator light above your screen.) Move the paper until you see your signature sitting just above the blue line.Once Preview has what it think is a good shot of your signature, it’ll appear in the “Signature Preview” window—and yes, you can go ahead and put the paper down.
  • Preview signature capture 300x149 Mac tip: How to sign a PDF without a printer or a scanner
    Just hold up a piece of paper with your signature and let your Mac scan it with its built-in iSight camera.
  • Everything looking good? If so, click the “Accept” button.
  • Go back to the “signature” button in the Annotations Toolbar at the top of the Preview interface, click it, and select the signature that you just scanned.
  • Move your cursor down to the dotted line in your PDF, and hover over it until you see part of the line turn blue. Click, and a tiny image of your signature will appear, surrounded by six little gray “handles.”
  • Click on one of those handles and drag it open to resize your signature until it fits on the signature line.
  • All set? Select File, Save Version at the top of the screen.
That’s it! Now you can save, print, or email the signed PDF as you see fit, no scanner required. You can also saved your scanned signature for future use, or delete it if you don’t want it sitting on your hard drive.

How to zoom the display on your PC or Mac

Windows magnify screen lens How to zoom the display on your PC or MacEarlier this month, I showed you how to zoom in on the entire display of your iPhone—a handy trick, especially for anyone with iffy eyesight. But did you know that you can also magnify the screen on your PC or Mac? You sure can, and it’s easy. Here’s how.


How to magnify your PC display 300x183 How to zoom the display on your PC or Mac
Just click a button on the Windows 7 magnification toolbar to zoom the entire screen.

For Windows 7:

  • Go to the Control Panel from the Windows Start Menu, then click “Optimize visual display” under the “Ease of Access” section.
  • Next, under the heading that reads “Make things on the screen larger,” check the box next to “Turn on Magnifier,” then click the Apply button.
  • You should now see a medium-size magnifying glass icon floating on your desktop. Click it to reveal the magnification controls, then try clicking the “+” button.
  • And … zoom! Your entire Windows desktop should double in size, to a magnification of 200 percent. Click the “+” button again to increase the magnification, or click “-” to return the zoom to normal.
  • The Windows magnification tool has three modes: full screen, which you just tried; “lens,” which lets you drag a square magnification lens across the screen; and “docked,” which opens a slim magnification window that’s docked at the top of the desktop.
How to zoom your Mac display 300x225 How to zoom the display on your PC or Mac
You can zoom the Mac's display in full-screen mode or with a smaller magnification lens.

For Mac:

  • Open System Preferences, click the Universal Access icon, then click the Seeing tab.
  • Click the “On” setting in the “Zoom” section, or just use this keyboard combination: OPTION + COMMAND + 8.
  • To zoom in, hit OPTION + COMMAND + “=”, or tap OPTION + COMMAND + “-” to zoom back out.
  • If you’d rather use a virtual magnifying lens than zoom the entire screen, check the box next to “Zoom in window.”
  • All done zooming? Then click “Off” in the “Zoom” section, or tap OPTION + COMMAND + 8 again.

How to stop programs from launching the instant you turn on your Mac

Here’s a quick question: how long does it take for your Mac to start up? Thirty seconds? A minute? Two minutes? Or just too long?
One reason your Mac is such a slowpoke when it’s first starting up could be that it’s trying to launch a slew of programs all at the same time.
Now, some of these programs might be actually be ones that do you want to launch automatically, such as the Safari web browser, or Apple Mail.
But other, not-so-necessary programs may be piling up in your Mac’s “login items” list, too—ones that set themselves to launch automatically without asking first.
Another factor that may be slowing down your system is the Mac’s new “Resume” feature, which restores a program to the precise state you left it in the last time you quit—meaning, for example, that Safari will re-spawn all the windows, tabs, and websites you had open during your last session.
But Resume also re-opens any and all apps you had running when you shut down your Mac, and that could lead to a crush of apps all trying to launch themselves at startup.
Now, if you’re the patient type, waiting a little longer for your Mac to boot up so that your programs appear just as you left them might be a fair trade-off.
But if you’d rather shave a few seconds—or even minutes—off the time it takes for your Mac desktop to settle down after hitting the power button, read on.

Cross items off your Mac’s “Login Items” list


Your Mac launches a series of programs each and every time it starts up. Some of these programs are critical for the smooth operation of your system; others, not so much.
To see a list of all the programs your Mac opens automatically, click the Apple menu in the top-left corner of the screen, select System Preferences, click the “User & Groups” icon (it’s under the “System” heading), pick a user (you, most likely), and finally click the “Login Items” tab.
Mac Login Items settings 300x225 How to stop programs from launching the instant you turn on your Mac
Just select the programs you don't want launching themselves at startup and click the "-" key.

You should now see a list of everything your Mac is launching (or trying to launch, anyway) whenever it starts up. Some of the items will be easy to identify—in my case, I’ve got Dropbox (the handy file-sharing app) listed, as well as something called an “Eye-Fi Helper” (an app that lets my Mac receive wireless images from my digital camera) and “AirPort Base Station Agent” (which keeps tabs on my AirPort Wi-Fi base station). Those items I’d like to keep.
I also found that Google’s Chrome web browser was on the Login Items list, along with a program that lets me transfer games and media to my PlayStation Vita handheld. Do I really need these programs auto-launching each time I start my Mac? Nah. To delete these or other items from the list (but not from your Mac, mind you), just select them and click the “-” button at the bottom of the list.
Other items are way more obscure. What’s the “LMILaunchAgentFixer”? Or the “CNQL1212_ButtonManager”?
Unfortunately, the Login Items menu won’t provide an explanation of what these arcane items do, which means you’ll probably have to turn to Google. “LMILaunchAgentFixer,” for example, turns out to be part of a program called LogMeIn, an app that lets me control my Mac remotely from my iPhone—and also an app I rarely use anymore. “CNQL1212_ButtonManager,” meanwhile, is a helper app for my long-gone Canon scanner.
Now that I know what “LMILaunchAgentFixer” and “CNQL1212_ButtonManager” are—and I’ve determined I don’t need them anymore—I’ll go ahead and delete their entries. Buh-bye!
Whatever you do, though, don’t just delete programs from the Login Items list if you’re not sure what they’re for. You may end up regretting it.

Keep “Resume” from re-launching previously open apps


Don’t get me wrong—”Resume” is one of the handiest new features on the Mac, especially for those of us who like to pick up in Safari or iCal right where we left off. But if you don’t want Resume relentlessly re-launching all the apps you had open when you last shut down your Mac, you can stop it from doing so—but only temporarily.
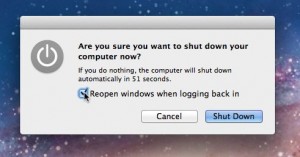
Mac shut down window 300x157 How to stop programs from launching the instant you turn on your Mac
Don't want your previously open apps to relaunch at startup? Just uncheck the "Reopen windows" box the next time you shut down your Mac.

The next time you select Shut Down or Restart from the Apple menu, take a closer look at the window that pops up; in addition to the “Cancel” and “Shut Down” or “Restart” buttons, you’ll also see a checkbox labeled “Reopen windows when logging back in.” Click the box to clear out the checkmark, and the only apps that’ll re-launch the next time your power on your Mac are those listed in the Login Items menu.
Sounds simple, right? But here’s the thing: the next time you select “Shut Down” or “Restart” from the Apple menu, the “Reopen windows when logging back in” setting will once again be checked. In other words, you’ll have to remember to clear that checkbox each and every time you shut down your Mac if you don’t want all your previously-open programs launching themselves when you turn your Mac back on.
Note: there is a technique for permanently un-checking the “Reopen windows” checkbox, but I wouldn’t advise trying it unless you know your way around computer scripts—and if you don’t know what a “script” is, you should probably steer clear.

Click or pinch to see your tabbed web pages

The latest version of Apple’s Safari web browser offers a new, eye-popping way to view your open browser tabs—provided you’ve updated your Mac to “Mountain Lion,” that is.
Just click the new “show all tabs” button in the top-right corner of the Safari 6.0 interface, and presto: your tabs will simultaneously shrink and spread into a row, giving you a bird’s-eye view of all your tabbed web pages.
Safari Show All Tabs button 300x197 Mac Mountain Lion tip: Click or pinch to see your tabbed web pages
Just click the “Show all tabs” button for a bird’s-eye view of your tabbed web pages.

Got a MacBook? If so, there’s another way to activate the new “Tab View” mode: by “pinching” your trackpad while the Safari window is active.
Next, try tapping the arrow keys on your Mac’s keyboard or swiping left or right on your trackpad to cycle through your various tabs.
Find a tab you want to view? Just click it, and it’ll expand to fill the Safari window.
Can’t find the “Show all tabs” button on your version of Safari? That’s probably because you haven’t installed Apple’s “Mountain Lion” system update on your Mac yet.
While you can install Safari 6.0 on a Mac with the older “Lion” system software (just click the Apple menu in the top-left corner of the screen and select “Check for updates”), you won’t be able to turn on “Tab View” until you make the leap to “Mountain Lion.”

How to boost the size of the mouse pointer

Having a hard time spotting that itty-bitty mouse pointer on your PC or Mac display? You’re not the only one.
Indeed, as computer displays get bigger and sharper, on-screen mouse cursors keep getting tinier and tinier. Will they eventually shrink down to nothing? Good question.
How to make the mouse cursor bigger 300x211 Windows/Mac tip: How to boost the size of the mouse pointer
Just dip into the system settings of your PC or Mac to make the mouse pointer bigger.

Well, there’s an easy way to save both your eyesight and your sanity: by dipping into your system settings and boosting the size of the mouse pointer.
Here’s how to do it…

For Windows:

  • Open the Control Panel (you’ll find it in the main Start menu), click the Ease of Access heading, then click the “Change how your mouse works” link.
  • Next, choose from the menu of options for changing the size and color of the mouse pointer, from “Regular White” to “Extra Large Inverting.”
  • All set? Click the Apply button.

For Mac:

  • Open the Apple menu (just click the Apple icon in the top-left corner of the page), then select System Preferences.
  • If you’ve installed the new “Mountain Lion” update on your Mac, click the Accessibility icon, select Display in the left column, then try moving the Cursor Size slider; when you do, the mouse cursor will start to grow or shrink. Satisfied? Just close the window.
  • Is your Mac still running “Lion” or an older version of Mac OS X? If so, you’ll need to click the Universal Access icon from the System Preferences window. Next, select the Mouse & Trackpad tab, then drag the Cursor Size slider back and forth to resize the mouse pointer.

How to fill in the blanks on a PDF

Got a PDF form you need to fill out? The new “Mountain Lion” update for the Mac comes with a clever trick up its sleeves: the ability to fill in blanks and checkboxes on just about any PDF, including those that weren’t designed for easy text entry.
You’ll find the feature in the Mac’s “Preview” app, which also lets you paste your signature into PDF forms.
Filling in a PDF form is as simple as opening it with Preview (which you’ll find in your Mac’s Applications folder) and clicking on any blank where text is supposed to go.
Drag and drop text in Mac Preview app 300x130 Mac Mountain Lion tip: How to fill in the blanks on a PDF
Just click on any text you’ve entered to drag it anywhere in the PDF form.
Once you do, a blinking cursor should appear, and you can start typing.
Done typing? Press the Return key or click elsewhere on the PDF to lock the text you just typed into place. To edit your text, just double-click it.
You can also click and drag your text anywhere in the document—a feature that could come in handy if Preview fails to detect a particular text field.
Last but not least, Preview should be able to pinpoint checkboxes on a PDF; just click a box to check it.

How to Customize Mac’s Folder Icon With Any Image

The folder icons on your Mac have been in use for ages, and it doesn’t help with searches if you have many folders in your Finder, especially when you have forgotten the folder name. There are a number of ways to view folders in Finder: you can sort and show item by icons, list, column and cover folder, but we have another idea.
Mac icon set
There is a simple action you can do on your Mac to change the image of your Folder icon. Instead of looking at the same boring blue folder icons, you can select any of your favorite images to turn it into your folder icon. This way, it will be way easier to tell your folders apart. Lets find out how to start customizing your folder icons.

Replace Folder Icon with image

There are only three simple steps to changing your folder icon to any of your favorite images.
  1. Select any folder of choice and press Cmd + I to open the folder info panel. You can also open the info panel by option-clicking on the selected folder and selecting Get Info.
    Info Folder
  2. Now open any images you want to use; you can open it with Preview, then press Cmd + A to select and Cmd + C to copy the image.
    Image Preview
  3. Point your cursor and click on the folder image at the top left corner of the folder info panel you open earlier, then press Cmd + V to paste the image.
    Paste Image
    Once you have, your folder icon will now change to the image you pasted earlier.
    Folder with Image
Now you already have a new look for your folder icon. To remove this image, simply click on the image at the top left corner of the info panel and press Delete

How to pause all your Notification Center alerts

One of the best—and, potentially, most annoying—features in the new “Mountain Lion” update is Notification Center, which pops up banners and alerts for incoming email, to-do items, upcoming appointments, and other noteworthy events.
That’s all well and good when you want to keep an eye on your Mail inbox or worried about missing a meeting. But what if you want to sit back and enjoy a movie on iTunes, or if you simply want a little peace and quiet for a few hours?
Well. you could always plunge into your Mac’s Notifications settings (click the Apple Menu, select Preferences, then click Notifications) and turn off the banners and alerts for all your various Notification Center-supported applications.
Eventually, though, you’d have to go back and turn notifications for each of your apps back on again—a tedious process, especially if you just want a temporary break.
But here’s the thing: you can, in fact, put all your notifications on “pause” with a simple swipe and click.
Here’s how it works:
  • Click the Notifications icon in the top-right corner of the screen (it’s the one with three short horizontal lines) to open the Notification Center.
  • Next, swipe up with two fingers on your trackpad, Magic Trackpad, or Magic Mouse. (If you have the Mac’s “natural scrolling” setting turned on, you’ll need to swipe down.)
  • At the top of the Notification Center, a blue switch labeled “Show Banners and Alerts” will appear. Go ahead and click the switch to pause all your notifications.
That’s it!
Once you’re ready to turn notifications back on, just click the switch again. If you forget to flip the switch again, don’t worry—your notifications will resume automatically the next day.

Things to do before installing “Mountain Lion” on your Mac

The latest version of the Mac operating system has arrived with a grab bag of enticing new features, including a “Notification Center” with alerts for incoming e-mail and calendar alerts, voice dictation, text messaging with iPhone, iPad, and other Mac users, and the ability to “mirror” a newer Mac’s display to an Apple TV-connected HDTV.
Not bad, and the price—just $20—is right. So, what are you waiting for?
Well, before you jump to the Mac App Store and begin installing, there are a few things you need to do before making the Mountain Lion leap. Once you’re done, by all means, go buy the update and start downloading.

1. Make sure your Mac will support with Mountain Lion


A major operating-system update like Mountain Lion usually demands more power and performance from your computer—and inevitably, there are older systems that no longer have the horsepower to keep up.
About This Mac window 300x175 3 things to do before installing Mountain Lion on your Mac
The “About This Mac” window will tell you is your Mac is new enough for Mountain Lion. (Looks like my MacBook Air made it just under the wire.)
For this year’s Mountain Lion update, there’s a slew of iMacs, MacBooks, and professional-grade Macs that don’t make the cut. Apple has a list of Macs that do support Mountain Lion right here, but I’ll go ahead and give it to you:
  • iMac (mid 2007 or newer)
  • MacBook (late 2008 Aluminum, or early 2009 or newer)
  • MacBook Pro (mid/late 2007 or newer)
  • MacBook Air (late 2008 or newer)
  • Mac mini (early 2009 or newer)
  • Mac Pro (early 2008 or newer)
  • Xserve (early 2009)
So, how do you find out which year your Mac was made? If your system is running on “Lion” (last year’s big Mac update), just open the Mac menu in the top-left corner of the screen, select About This Mac, and click the More Info button. When you do, the next window will tell you the model and date for your particular Mac.
Another way of looking up your Mac’s pedigree is by pulling up its serial number (which, again, you’ll find in the About This Mac window) and plugging the last few digits into a Mac serial-number lookup site, like this one.
If your Mac is new enough for the Mountain Lion update, congrats! If not, don’t worry—you can continue to use your current Mac with its older operating system, but you won’t be getting any new Mac OS X features…ever, unfortunately.

2. Check for updates


Software Update window 291x300 3 things to do before installing Mountain Lion on your Mac
Select “Check for Updates” under the Apple menu to find available software updates for your Mac.
Before you start installing Mountain Lion, you’ll want to make sure your current system software is completely up-to-date—and that means checking for software updates.
  • Go back to the Apple menu in the top-left corner of the screen, open it, and select Software Update.
  • A window with a blue progress bar will open as your Mac checks for available updates to your system. If it finds any, you’ll see a message that reads “New software is available for your computer.”
  • Go ahead and click the blue “Install” button, or click “Show Details” for a list of specific updates that your system wants to install.
Now, if you haven’t checked for software updates in awhile, you might have a lengthy list of updates to install; if so, sit back and get ready to wait. I’d also recommend setting your Mac to install new updates automatically; here’s how to do it.

3. Back up your Mac


No question about it: there’s nothing fun about backing up your hard drive. But if your Mac chokes during the Mountain Lion update and refuses to boot up again, you’ll be happy you made the effort.
The good news is that the Mac comes with a built-in, easy-to-use utility called Time Machine. All you need is an external hard drive (which you can snag online for about $100 or so) and a little patience.
Once you have Time Machine all set up, it will back up your Mac once an hour whenever the external drive is connected to your system.
If you have problems with the Mountain Lion update process—or, indeed, if anything bad befalls your Mac—you can use your Time Machine backup to restore your system, either to your old Mac or a brand-new one.

Mac keyboard shortcuts

Want to switch applications, take a “quick look” at a file, get help, or log out, all without touching your mouse? Read on for a dozen keyboard shortcuts that’ll let you zip around your Mac’s desktop like a pro.

1. COMMAND + TAB
Just like on a Windows PC, this keyboard command calls up a horizontal bar of icons representing all your running applications; hold the Command key and keep hitting Tab until the cursor lands on the app you want to use, then release.

2. SHIFT + COMMAND + N
Instantly creates a new folder on your Mac desktop, or in the active Finder window.

3. COMMAND + SHIFT + ?
Opens the Mac “Help” form, either for the Mac OS X “Finder” or the active application; just start typing to search for help.

4. SPACEBAR (or COMMAND +Y)
Activates the Mac’s powerful “Quick Look” feature for the selected document—anything from a PDF or Word file to an image or an MP3.

5. OPTION + COMMAND + Y
Select a group of files, then use this keyboard command to jump to Quick Look’s “slideshow” mode—perfect for launching an impromptu slideshow of, say, a batch of images on your desktop.

6. SHIFT + COMMAND + U
Takes you straight to your Mac’s Utilities folder, where you’ll find such tools as Disk Utility (good for managing, repairing, and erasing drives mounted on the desktop), Grab (for taking screenshots), and Keychain Access (which stores the usernames and passwords you’ve saved in Safari).

7. COMMAND + SPACE
Opens the Spotlight search form in the top-right corner of the screen; start typing, and your search results will appear within seconds.

8. OPTION + COMMAND + EJECT
Puts your Mac straight to sleep, no Apple menu needed.

9. OPTION + SHIFT + COMMAND + Q
Need to log out of your Mac in a hurry? Then here you go; just keep in mind that this keyboard combo will log you out immediately, without waiting for confirmation.

10. OPTION + COMMAND + D
Press this keyboard shortcut once to hide your Mac’s desktop dock, then press the keys again to make it reappear.

11. COMMAND + CONTROL + D
Displays a definition of the selected word. (Note: works best in Apple’s Safari web browser, less so in other applications.)

12. COMMAND + DELETE
Sends the selected file directly to the Mac’s trash can.
Got any other handy Mac keyboard shortcuts to share? Post ‘em in the comments below!

How to preview a web link without leaving the Mail app

Got an e-mail with a link you simply must click (hopefully not a spammy link, of course), but not quite ready to leave your inbox?
Good news: there’s an easy way to sneak a peek at a web link without leaving your Mac’s Mail application.
Arrow icon for web links in Mac Mail Mac mail tip: How to preview a web link without leaving the Mail app
Click the little arrow icon to the right of a web link to preview the page without leaving your inbox.
Just hover over the URL with your mouse until a little arrow icon appears to the right of the link.
Click the arrow, and a preview of the web page that the link is pointing to will appear in a pop-up window.
You can scroll within the preview window, click any of the links (although doing so will take you out of the Mail app and into the Safari web browser), or even save the web page to Safari’s “Reading List.” 
Want to open the page in Safari? Just click the “Open in Safari” button.
And what if you’d rather just keep reading your email?
Easy: just click anywhere outside of the preview pop-up to make it disappear, then go back to your messages.